December 29, 2015

Macrame Diamonds

Scarab in micro macrame bracelet by Sherri Stokey of Knot Just Macrame.

With our holiday celebrations in the rear view mirror now, I've had a bit of time to sit down and play with my beads.  I don't feel like I've finished experimenting with my newest design - I call it Woven Diamonds (you can find the online class here, if you are interested).

I had some little scarab beads and it turns out they nestle just as snug as a bug in a rug... (okay, I'm a little sorry for that one).  The scarab does fit rather well in the center of this bracelet, though.  I kept the background neutral and then used a great mix of beads with some greener turquoise, off white and bronze.  

Scarab in micro macrame bracelet by Sherri Stokey.

While I was digging through my stash for oval shaped beads, I ran across a sodalite one I couldn't pass up.  I paired it with navy blue cord and made a seed bead mix to match.  

Sodalite micro macrame bracelet by Sherri Stokey.

I'm pretty happy with the way both of these turned out.  They're listed in my Etsy shop, if you just can't resist.  I also have a couple kits listed if you don't want to have to find the materials yourself.  One is in the sodalite and blues and the other is turquoise like this:

Micro macrame cord and beads - materials kit for woven diamonds bracelet.

Happy knotting!!

December 24, 2015

Merry Christmas!


Anyone familiar with Buffalo Bill Cody?  He was quite a famous figure back in the late 1800s and early 1900s.  Among his other exploits (some good and some not-so-good) he was a Pony Express rider and a scout (aka spy) for the US Army.  He later became a showman, founding a Wild West show that he took throughout the US, Great Britain and Europe. 


Col. Cody and his wife, Louisa built a large Victorian near North Platte which has since been restored and made into a state historical park.  At Christmas, community groups and businesses come together to decorate the mansion, inside and out.  It's only open for a few magical evenings, but it's worth the trip to see.  Each (and every!) room is decorated in a different theme.  They serve hot cider and roasted chestnuts and offer rides around the grounds in a wagon drawn by a team of horses complete with tour guides Buffalo Bill and Louisa (okay, they might be actors, but work with me here).  

Here are a few highlights from the mansion this year:


Isn't it beautiful?  It really was a fun evening with my daughter and friends and I'm so glad we carved out a little bit of time to go.  And I'd never had a roasted chestnut before, so I can cross that off my bucket list now :)

I hope you find a few minutes to do something that makes you happy this holiday season!!  Merry Christmas!

December 18, 2015

Making Memories

Toddler on Santa's lap (my dad is the toddler!)

My daughter is home from college for the next few weeks and it feels like everything is "right" again with her there.  This time of year always seems to make me nostalgic and as we spent yesterday making candy and cookies, I couldn't help but remember other years and other Christmases.  

That photo up there?  That's my dad on Santa's knee some 60 odd years ago.  I think I would love this photo even if it weren't my father - the mid century feel to it is so perfect, but knowing it's Dad just makes it extra special.  Here's another photo of him a few years later with his sisters.

1958 Christmas

The tree and the toys and the little footie pj's just melt my heart.  

Me and mom in front of the tree.

Then I came along.  That's my mom and I.  And my puppy.  And my toys. 

Sisters with dolls in front of Christmas tree.

This one is my mom (oldest) and her sisters.  I don't know where Mom's doll is - maybe she was too old for one?  I love the little details in this photo, too.  How long do you suppose it took my grandmother to get their hair all done and get them into their little dresses and bobby socks?  Did you notice the drapes and carpet?  Someone wasn't afraid of pattern.

Holiday dinner.

This photo is what I think of when I picture Christmas growing up.  Lots of family getting together - great food and lots of laughter.  This photo has my dad, both of my grandfathers, one of my grandmothers (the other was there somewhere LOL) and my great grandmother.  I'm the one with the terrible fuzzy hair-do at the bottom left of the photo.  Stuffing my face.

Four generations decorating Christmas cookies.

My mom always decorated sugar cookies with my brother and I, too, for as long as I can remember anyway.  This is four generations of us together a few years ago - my daughter, my mom, me and my grandmother.  Making memories.  Last year my daughter had a few of her friends over to help:

Friends making candy and cookies.

And this year Carter is getting in on the action:

Carter decorating his cookie.

 Carter licking the beater.

I hope you'll forgive me if I'm not here too much over the next couple of weeks.  I will be busy making new memories and I hope all of you will, too.  Enjoy the season!

Carter helping.


December 16, 2015

New Online Class: Woven Diamonds Micro Macrame Bracelet

Woven Diamonds micro macrame bracelets by Sherri Stokey.

It's here!  It's here!  (Well, it's here:  http://craftartedu.com/sherri-stokey-woven-diamonds-micro-macrame-bracelet.)  My newest micro macrame class is out for all you DIY-ers.  I call it Woven Diamonds and it includes directions for making both options of this macrame bracelet, the one that includes a focal stone:

Woven Diamonds micro macrame bracelet with focal by Sherri Stokey.

And the option that features a repeating pattern with no focal section:

Woven Diamonds micro macrame bracelet without focal by Sherri Stokey.

As always, I've included lots and lots of still photos for you as well as in depth step-by-step instructions.  I have been including video in my classes for quite a while, but I really stepped up the video component this time - with 45 minutes of video included within the class! 

Woven Diamonds micro macrame bracelet with aqua terra stone by Sherri Stokey.

I've rated this as an intermediate project.  It only uses two different macrame knots, so it's not really hard in that respect, but there's a little bit of fancy footwork involved in getting the cords into the right position for the woven diamond sections (aren't they pretty, though - all that texture!).  I don't think I'd recommend this be someone's first adventure in micro macrame, but that said, if you're a determined beginner and you're able to follow instructions well, everything you need to be successful is included in this class.

Woven Diamonds micro macrame bracelet options.

I made up a few kits to go along with the class that include the components you will need to make either version of the bracelet (the focal bead is in there, but you can choose to use it or not).  I will have them available in my Etsy shop soon.  (A word of warning - I did mix my own seed beads for this one and I never write down my recipes, so once these are gone there's no way I can recreate them.  If you want one, snag it while you can.)

The folks at CraftArtEdu.com, being the nice folks they are (aren't I always telling you that?) are having a special introductory price on this class for a short while.  As if that's not enough, all of my other classes are available at special rates as well!  No codes needed.  You can find all of them here:  http://craftartedu.com/catalogsearch/result/index/?limit=20&q=sherri+stokey.

I always love student feedback, so if you take one of my classes, please do let me know how it went for you! Happy knotting!

December 2, 2015

Gollygeewhiz I've Been Busy


Pick an excuse:   I've been a) bored (read boring) with nothing to say, b) too busy to blog or c) too exhausted to blog.  Any one of them probably has some truth to it, but I'm back!  And you can't make me go away again if I don't want to because it's my blog and I am the queen in these here parts.

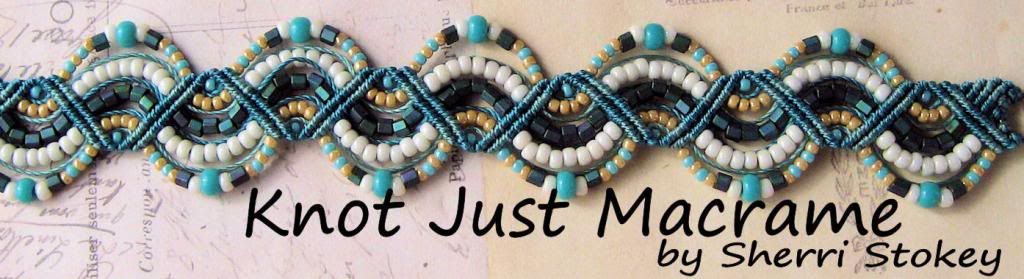
I'm working on a new micro macrame class for CraftArtEdu with this knotted textural design.  I couldn't decide if I liked it better with the focal section like above, or without it like this:


I did an informal poll and the results were pretty much even across the board, so I'm putting in both versions and everybody wins!  Because yay, we all love to be winners!!

I've been photographing and editing (jeez, when will I ever get good enough photography that I don't have to spend hours editing?) until I can't stand it any more.  I've got quite a bit of video for this class - around 45 minutes I think!  And that's on top of the step by step still photos and written instruction and narration.   
This design isn't really hard, not really.  It's more confusing than hard.  Or maybe that isn't the right word, either.  It's fussy because you have to switch the order of the cords all the time.  I thought about doing it a different way that required less switching, but then you have to have all the cords going at the same time and it's hard to pick through them and find the one you wan to be working with, so I don't know which is worse.  *sigh*  And that, my friends, is why I ended up with 45 minutes of video.  I'm thorough :)

So keep your eye out for this new class.  It doesn't have a name yet - any suggestions?

Oh, and in between all that, I decorated for Christmas!  This year we put up three full size trees and we started before Thanksgiving.  I was cocky and made the comment that we wouldn't be home for Thanksgiving, so we wouldn't have to "eat Thanksgiving dinner while staring at a Christmas tree".  That one came back to bite me in the behind when we had icy roads Thursday morning and I had to put together an impromptu Thanksgiving dinner at my house.  I tried to figure out how to hide three full size Christmas trees, but that was a no-go.  Want a peek?


One of our trees is done in gold and bronze with burlap and feathers.  Sounds odd, but it's really pretty.  Really hard to photograph (did I already whine about my photography ability?).  Want to know the fun part?  The feathers came from feather dusters I took apart.  They're all downy and fluffy and even walking past the tree makes them move a bit which really gives the tree a fun quality.


The tree in the family room where I spend most of my evening is my favorite - it's got aqua in it!  I love the way the lights make the white tree glow and the red and teal give it a very retro vibe.  I made the tree skirt with felt and pompoms to really play up the retro angle.  Sorry the tree top is chopped off - I really have to fire that photographer.  Here's a close up of some ornaments, though:


I love it!!  The third tree is Carter's tree.  None of my pictures of that one were worth a darn, but Carter loves it.  We loaded on all the animated and light up ornaments and all the fun cartoon characters, so he spent hours making the hens cluck Jingle Bells, listening to Spock wish everyone a Merry Christmas and watching the tiny Matchbox car go around the track.  It's going to be a magical Christmas.

So, did you come up with a name for my new class yet?  (Yes, this is how my mind works - I'm all over the place!) 


November 21, 2015

Looking for Micro Macrame Classes?


 If you're thinking about making a couple gifts for special people on your list, pop over to CraftArtEdu - but hurry!!!  All of the micro macrame classes are on sale at a whopping 35% off through Sunday (November 22, 2015).  You'll find the code and all of the details here.

And if you're thinking you won't have time to get gifts made before the holidays, at this price you'll want to buy a class or two in anticipation of the January blues!  It will give you something to take your mind off the weather :)


November 15, 2015

Beading Back In Time: The Final Reveal

Beaded fringe with feathers and jaguar.

It's time!!  Well, actually it's past time, but we agreed we all needed a bit longer to work on our projects for this final Beading Back in Time blog hop reveal, so... It's time!  The challenge this round was to create a piece based on a favorite historical period from 500 AD to present.  As with the other challenges in the series, the hop hosts are me and my pal, Lindsay Starr of Phantasm Creations.  

Easter Island Guy by Dreams and Elements

I had every intention of making a piece with this awesome Easter Island guy from Anastasia  at Dreams and Elements.  If you're not familiar with her work, you need to go check it out. I've worked with some of her beads before (visit this post) and they're really amazing.  I liked these pieces so well, I asked Anastasia to do this hop with us and post about them.  You can find her post here.

I have a really cool project in mind for the Easter Island dude and I'm not going to spoil the surprise.  You'll just have to stay tuned for that one.  Meanwhile... I got distracted by a trip to Cancun.  Well, not actually Cancun, but Chichen Itza.  I've been lost in daydreams about Maya civilization ever since my visit there last month.  How could I not be, with sights like this:

Chichen Itza pics

And this:

Chichen Itza pyramid.

I'm enthralled.  I've spent hours and hours researching the Maya culture, just for the satisfaction of learning something I didn't know before.  I wish I could shrink myself down small enough to squeeze through time and transport myself back to that place so I could experience what it must was like to live there (yes, I'm geeky like that).

The Short Version:  the classic Maya flourished between 250 and 900 a.d.  They had around 40 cities built of stone with populations ranging from 5,000 to 50,000 people in each one.  That may not seem like a big deal, but for a civilization then to be able to feed that number of people in one place, it really was amazing.   Chichen Itza was really starting to flourish about the time the other great Maya cities were dying out (for reasons unclear to us).

It would have been a magical time, and the people were deeply religious.  They believed in many gods and elaborate ceremonies and rituals were an important part of their lives (yes, including human sacrifice).  One of the main gods was Kukulkan, the feathered serpent deity to whom the pyramid at Chichen Itza was dedicated.

Serpent clasp.

The ancient Maya made significant advances in astronomy (read up on the orientation of the pyramid at Chichen Itza sometime, if you don't believe me) and mathematics.  They had a system of writing (hieroglyphs).  They built temples and palaces that survive to this day.  How could I not be fascinated?

I found some photos from the late 1800's, when Chichen Itza was first "rediscovered":

Chichen Itza

Chichen Itza

Isn't that incredible?  They've since rebuilt several of the structures to what we see today, but if you close your eyes and look closely, you can still feel the original architects. Remember the feathered serpent god?  I found an old (late 1800's) photo of one of the carvings of him on the Temple of Kukulkan at Chichen Itza and compared it to a photo I took last month.

Kukulkan carving on pyramid

Isn't that cool!  I really, really want to know what it must have been like in its heyday!  If only...

Colorized version.

Colorized version.

These colored images are some I found (thanks Tulane University) of what it might have looked like 1000 years ago.  The structures we see now are all monochromatic stone, but when they were built, they would have been a riot of bright color.

Many buildings would have been red with colorful accents.  I spent an afternoon "coloring" my own pyramid to get into the mindset:

Colored pyramid.

And then I decided to "build" one.  I started with a pile of cord and tried to recreate in knots the stepped sides and sweeping staircases of the Chichen pyramid.

Micro macrame pyramid in progress.

Did I lose you?  That's not a wedding cake (although it does sort of look like one at this stage).  Somewhere along the line while I was daydreaming about an ancient culture, it dawned on me this is what I had to use for the Beading Back in Time hop!  I wanted my piece to reflect the Maya's affinity for bright colors as well as incorporating the feathered serpent, the jaguar (there were several versions of the jaguar god), and, of course, the pyramid.

Maya necklace done in micro macrame with beaded fringe.

I suspended my finished pyramid from ten spiraling cords in bright colors ranging from blood red and Maya blue to the greens of the jungle.  At the back of the necklace, I brought all the cords together in a spiral ending in a clasp featuring twin serpents.  I added a jungle-y fringe at the bottom with some feathers (a favorite adornment of ancient Maya) and a jaguar charm.

Maya pyramid necklace in macrame by Sherri Stokey of Knot Just Macrame.

I hope you like my piece and I hope you'll join me to checking to see what everyone else has made for this, the Final Reveal of the Beading Back in Time Blog hop series.

Sherri Stokey <-----you are here
Lindsay Starr <-----Co-Host
Anastasia Kristala Urbanski
Jenny Davies-Reazor
Stephanie Haussler
Niky Sayers
Melissa Trudinger
Kelly Rodgers
Michelle McCarthy

If you've enjoyed this Beading Back in Time hop, you can find previous ones here:  Pre-Human Edition,  Early Human Edition and Early Civilization Edition.

If you'd like to read more about the ancient Maya civilization, these were some of my favorites:  Maya 3D (great if you want to pretend you're there!),  Virtual Chichen (also great for "almost" being there) and the Maya Civilization Wikipedia page (lots and lots of links to even more info).  Thanks for joining us today!

Easter Island Statues and Beads

Hi there! My name is Anastasia, I am designer at Dreams and Elements and very honored to be a guest writer in Sherri's blog!

Today I will tell you about my biggest inspiration – Moai statues from Easter Island.


There is a lot to tell about Moai, but in today's post I will just highlight the main information about these mysterious monoliths. Many people already know, that these grumpy-looking guys are found in Easter Island, which is located in the South Pacific Ocean, few thousand miles from Chile's west coast. Many archaeologists believe, that Moai are representation of the ancient Polynesian's ancestors. Despite being called "Easter Island Heads", these guys are actually whole-body statues - on the early known photographs of them, their bodies were hidden in the ground. They were are carved out of compressed volcanic ash, basalt, trachyte and red scoria. 


How did I get the idea to make little grumpy Moai-ish faces on my beads and jewelry? It is really a funny story - once I saw a dream where I was observing Easter Island at night. Moai statues were so mysterious and beautiful on a starry night sky background, it seemed very real. When I woke up I had an urge to try to make some stylized beads with pouty faces out of polymer clay and to my surprise they ended up looking pretty cool! I hope you like them too :)


Fun fact: some Easter Island Heads actually used to have eyes! It was discovered, that statues used to have eyes made out of coral with either black obsidian or red scoria pupils.


This is it for today. Thank you very much for reading, you are all awesome!

Love,
Anastasia.

Related Posts Plugin for WordPress, Blogger...