December 29, 2013

We Now Return to Our Regularly Scheduled Programming

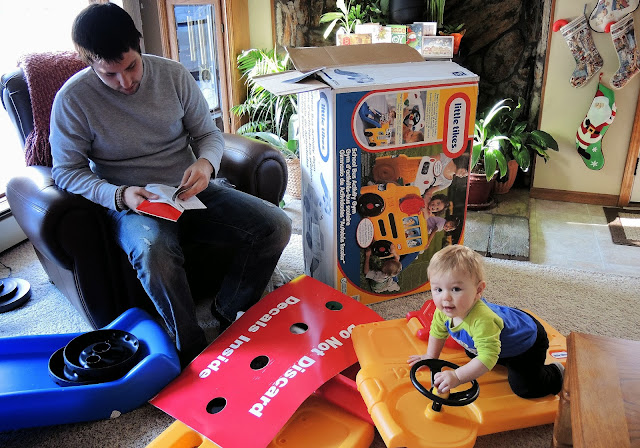
Carter and Grandpa assembling a toy

So, I've been neglectful of my blogging for a few days, but I have a good excuse.  We were just carrying on, minding our own business last weekend when life decided to throw us a curve ball.  

Nick and Carter assembling a Christmas present

Last Saturday we were having family out to celebrate Christmas a few days early to accommodate everyone's schedules.  We bought our grandson, Carter, a Little Tikes school bus with a slide because he's such a little daredevil and loves to climb.  I thought maybe if we gave him somewhere safe to climb, I could keep him from trying to climb on everything else (kitchen drawers, dishwasher, coffee tables).  My son, Nick, was doing his parental assembly duty and then suddenly starting having a seizure.  Nick is 21 years old and is the picture of health and let me tell you, this came from nowhere and slapped us right across the face.

We rushed him to the emergency room, but after scads of tests including CT scans and MRIs, doctors still couldn't tell us what was wrong.  All they could say is that our son was very, very ill.  They were guessing some form of meningitis since the scans didn't show any bleeding or tumors in the brain, and were warning us that his brain could have already sustained damage.  They put him on a ventilator and sedated him to try to stop the seizures.  I have never been so scared in my life.  

On the second day with no change and no answers in sight, my husband and I made the decision to move him to a bigger hospital with more resources.  That hospital is about 300 miles away, so they moved Nick by helicopter.  I won't bore you with all the details and minutia, but believe me, each minute he spent in the neurological critical care unit was an eternity.  I spent nights in the chair beside his bed and held his hand down when the sedation would start to wear off and he would try to pull the tube out of his throat.  My husband and daughter would try to get a few hours sleep at night and spend days in his room conferring with the teams of doctors caring for him.  

On Christmas Eve, we got the best present ever.  They were able to switch the ventilator over to where he was able to breathe for himself.  This may not look like much to you, but it was the happiest sight I'd had for days:

Breathing on his own

Breaths he was taking on his own.  What followed has been nothing short of miraculous to me.  The doctors let him start coming out of the sedation.  He was still very fuzzy and disorientated and trying to pull at the tubes and IVs and wires.  The doctors were trying to talk to him and reason with him, but he was having none of it.  I just kept thinking about the possibility of brain damage and worst case scenarios.  They asked me to talk to him and when I did, asked him if he heard his mom.  People, when he very slowly nodded his head just a little bit, I wept tears of joy.  He was responsive!!!  They were able to remove the breathing tube and stop the medications keeping him knocked out.

Nick in the CCU

He still had to spend another night in the critical care unit, but he was improving by leaps and bounds.  By Christmas day, they moved him to a regular room and let him take a shower.  By Thursday, we were able to bring him home.  He is healing and is doing so well.  

Yesterday, we decided to have our belated Christmas celebration for our family.  

Opening presents

Typical for his age, Carter spent more time playing with the boxes and paper than the new toys, but he was pretty fascinated with a Slinky.

Carter likes his Slinky

Carter and Aunt Megan

Nick still tires pretty easily, but that just puts his schedule in line with Carter's:

Tuckered out.

So forgive me, friends, for my absence here.  I am hugging my family a little tighter and treasuring even the mundane right now.  Life seems so fragile.  I just need to take a moment and regroup.  Hugs to all of you and I hope you are having a great holiday season.

December 16, 2013

Busy Busy Busy

Micro macrame bracelet in raku colors by Sherri Stokey of Knot Just Macrame

I don't know about you, but I'm running myself ragged this month trying to keep up with everything.  Between work and family, decorating and shopping, I feel like there aren't enough hours in the day.  Macrame is my relaxation.  My "me" time.  I haven't been able to do as much as I'd like with all the other things, but I did manage to make a really pretty bracelet this weekend.  It's done in colors pulled from my "raku" color palette:

raku color palette in beads and cord

I've worked mostly with the colors found on the right side of this pile, so just to challenge myself a bit, I set out to work from the left side.  The colors there are more of the olive greens and the coppery golds and oranges.  I tried.  Really I did!  I finally had to add a bit of navy to get something to suit me:

Olive, orange and navy micro macrame work in progress

You wouldn't think it came from the same pile of beads, would you?  

If you missed the other pieces that rose from this mound, you can find those posts here and here and here.  And if you're looking for me, I'll be in the kitchen making candy and cookies and cheese balls for our family get-together this weekend!  


December 6, 2013

Lark's Head Knots - Macrame Knot Tutorial

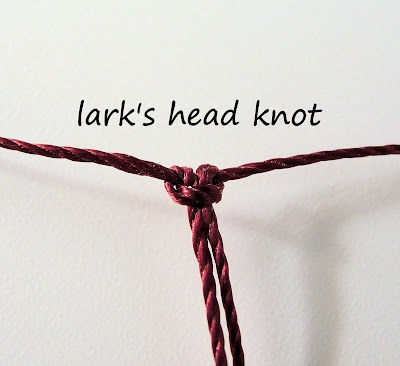
Lark's head knot larks head knot micro macrame

This, my friends, is a lark's head knot.  I don't know why it's called that.  I did research it a bit out of idle curiosity and  from what I can see the knot itself has been around forever, referred to by names like "cow hitch" and "girth hitch" until some dude named Tom wrote a book in 1866 and dubbed it a lark's head.  You call it what you want, but I'm sticking with Tom and calling it a lark's head knot since that's what I've always called it.  This is one of those knots that can be made in several different ways, all resulting in a knot that looks like the picture above.  Think of it like using different shortcuts on your computer that all get you to the same place.

I did this video first because this is the version of the knot that seems to give folks the most difficulty.


This version is useful for finishing off the end of piecess, but be sure to put whatever you want on the split ring before you start knotting (clasp or extender chain).  I find it easiest to hold the piece in my hand since you need to be able to get to the underside of the split ring.  I hold the split ring in my left hand to do the knotting from left to right and I try to get the cords I am not working with (the ones on the left side of the piece) out of the way as best I can.  

Take the first knotting cord through the split ring from the top and through the loop in your cord and pull it snug for the first half of the knot.  This first knot can be tricky since it's sometimes hard to know where your loop is.  Just remember that the tail always goes behind - so if you're knotting from left to right, the tail of your cord needs to come out on the left side on that first half knot.  It's hard to describe, but if you get stuck, try to remember that the tail goes behind and it will help.  Hopefully.  

To make the second half of the knot, use the same knotting cord, but this time go through the split ring from the underside.  Then through the loop and tighten it up.  If you're knotting from right to left, hold the ring in your right hand.

Whew!  Now that you've got the hard version out of the way, let's try the easy one.  This one is great for mounting new cords and is easy.  Really easy.


See?  I told you it was easy.  But the two loose ends of your cord together and then find the resulting loop in the middle of your cord.  Put the cord down through the split ring, then tuck the two loose ends through that loop and tighten.  Bam!  Done.  Works around another cord instead of a ring, too, if you so desire.

And finally, another way to make the same knot.  This time around another cord in the middle of a piece.  Do it the same as around a split ring.  Over the cord and around, though the loop.  Tighten.  Then under the cord and around, through the loop.  Tighten.  Ta da.


If you're having all kinds of fun and want to try another knot, check out the Double Half Hitch Tutorial.

December 2, 2013

Twelve Days of Creativity, Day 1

CraftArtEdu.com Twelve Days of Creativity Day 1

The amazing Ms. Donna Kato and her team at CraftArtEdu.com have been working hard and are bringing us the Twelve Days of Creativity.  I'm tickled to say my new Spiral Micro Macrame class is being featured on Day 1!  And what exactly does that mean for you, you might ask?  Well, if you're interested in learning micro macrame, this class, and all of the others I've done for CraftArtEdu are available at a reduced price until Friday.  

I don't mean to sound like a commercial here, but there's a reason I chose to offer my classes through CraftArtEdu.com.  They are committed to bringing you only the best classes and making sure each and every one of their customers is satisfied.  And they back that up with a 100% money back guarantee.  Add to that the fact that once you purchase a class, it's yours forever and it's just about perfect, isn't it?  View your class whenever you want.  As many times as you want.  In the comfort of your own home.

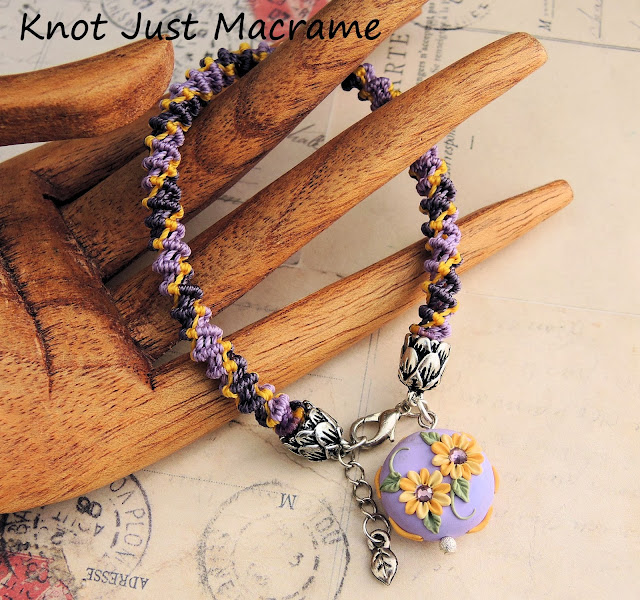
My new class will teach you how to make a knotted micro macrame spiral rope that you can use to make a bracelet like this:

Knotted micro macrame spiral rope bracelet by Sherri Stokey of Knot Just Macrame

Pretty, isn't it!  The polymer clay bead that inspired this piece is by Tania Spivey of Moobie Grace.  I pulled the colors from the bead, then added some flower bud cord ends to complete the look.  I cover how to do this, step by step, in the class.  With still photos and videos.

And what else does the Twelve Days of Creativity have to offer?  Tips and hints and tricks from some great artisans, that's what!  Want to see what I do to get past a creativity slump?  You can find out here.  I can't wait to see what these folks come up with for the next eleven days, and you can bet I'll be watching!  I hope you'll join me.


Related Posts Plugin for WordPress, Blogger...