
I thought I'd start a little tutorial series here on my blog and show you how to do some of the macrame knots that I use in micro macrame pieces like this bracelet. The most common knot in the micro macrame pieces I make is the double half hitch (DHH). All of the knots you can see in this piece are double half hitches.
In order to make this knot, you need one cord called a "holding" cord and another called the "knotting" cord. The cords will change positions throughout a design and a cord that is the holding cord can become a knotting cord in another row, but that's all stuff for another lesson. In this post, we're just going to focus on making the knot, and for this knot, you need one holding cord and one knotting cord.
The holding cord will be the one you tie the knot around - the knot bearer, if you will. The knotting cord is the one you actually use to tie the knot.
Did you get that? Start with the knotting cord under the holding cord. Take it up, over and around the holding cord and then back through the loop. Make the second half of the knot (it's a DOUBLE half hitch, remember) the same way - up, over & through the loop. Tighten neatly. One trick to a nice looking macrame piece is consistent tension, so work on that. Tight but not too tight.
Working the knot from left to right will make a row that goes across from left to right. But what if you need to come back across your piece? You will need to know how to make the same knot from right to left:
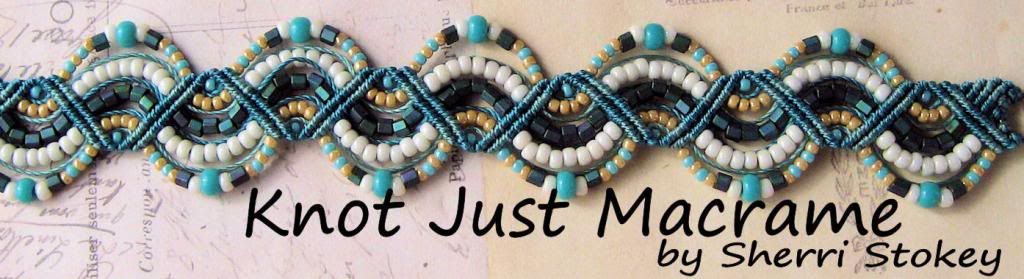
Looks easy enough, right? You can do this! And if you can do this, you can make this:

Thank You so very much for the two videos
ReplyDeleteSherri, great instructional article. It it very helpful especially for beginners.
ReplyDeleteGreat videos Sherri! I have the leaves tut from you and have had a blast playing around with it! I have been experimenting with cording I had around the studio but am getting ready to purchase some nice nylon cord. What size do you typically use? It looks like maybe a #18 nylon or the larger c-lon spool, is that correct?
ReplyDeleteI mostly use the .5mm size nylon cord (which is also sometimes called #18). I buy either c-lon or superlon (they're the same thing, just different shaped spools and distributed by different companies). There are TONS of colors to play with!
DeleteThanks for sharing Sherri! Putting in an order tonite :)
ReplyDeleteThank you for the videos on the DHH. Helped a lot.
ReplyDeleteGood!!
DeleteIs there reason my right to left dhh would look sloppier than when I do it in the other direction. I have tried over and over again and just can't seem to get it.
ReplyDeleteThank you,
Tess
Yes and no - it takes a lot of practice to get comfortable going the "opposite" direction but there's also the issue of the twist to the cord fibers which will make the knots look different if you look close enough. at some point, you just have to think of macrame as an art and embrace the imperfections!
Delete