January 29, 2015

Beading Back in Time - a Blog Hop Update

Tiny dinosaur skulls (replicas), beads and cord.

A few of my beady friends and I have been busy this last month working on projects for our Beading Back in Time Blog Hop coming up this Sunday, February 1st.  If you missed my first post about it, here's the skinny:  participants must make something inspired by the prehistoric theme, something from a time before humans, then come back on the 1st and show it off.  Pretty simple!

Various ammonites in copper, pewter, ceramic and fossil

I spent quite a lot of time digging through my stash, finding suitable bits and pieces.  I came up with quite a few ammonites, including fossilized specimens, a Green Girl pewter button, a ceramic pendant and a great copper piece from Kristi Bowman.  

Fossilized trilobite, plus ceramic and glass trilobites.

Trilobites are obviously a favorite of mine, too, as I found quite a few examples.  I have a large pendant by Sheri Mallery (the lightest one in the photo), a fossilized one (the black one at the top), a pair of connectors by Diana Ptaszynski and quite a few Czech glass ones.

With all these fun things I found to fit the theme, aren't you curious to see what I made for the hop?  Hmm?  Even a little bit curious?  

You'll have to come back here on Sunday to find out!!

Dinosaur skeleton models messing about in beads and cord.


January 26, 2015

Valentine's Day in Macrame

Micro macrame cuff design with heart and leaves.

Whether or not you are a lover of Cupid and pink frilly hearts and red and lace and all things romantic (and I am not), if you were born and raised in a town named Valentine, you have to celebrate Valentine's Day.  I'm pretty sure that one's in the rule book - "Rules of Social Behavior and Societal Norms for Valentinians".  You just have to let yourself go with the flow.  Embrace it and feel the love.  If you missed that chapter about my life, check the posts here and here to see some pretty photos of my hometown and one really tragic photo of teenage humiliation (mine).  Moving right along...

Selection of seed beads and bead cord in red.

In an effort to comply with Ye Old Rules, I'm trying to make nice with some old enemies.  Red and Pink don't like me and the feeling is reciprocated twofold.  I've tried to like them, but they just don't give me the warm fuzzy feeling I get from cool colors (and yes, I see the irony there).  But since it's in the rule book and all, I figured I'd give it another shot.  I spent days looking at red beads and red cord and ordered up a whole bunch to beef up my stash.  
Then I didn't use any of them.

Valentine's Day cuff in micro macrame by Knot Just Macrame.
I'm still sort of obsessed with cuffs, so I thought I would expand on that for this project.  I did the top the same as the cuffs I designed for the cuff class, but I switched up the main panel.  I knotted a heart outline in the center, then brought a leaf and vine pattern off the heart in each direction.  It sort of reminds me of a Pennsylvania Dutch design.  I also added a scalloped edging with beads along the bottom for a sort of lacy finish.  I wanted the knotting to be the star of the show here, so I kept the it all monochromatic.  And yes, it's pink.  Or pink-ish.  Take that Red.

Valentine's Day cuff in micro macrame by Sherri Stokey


I think it's quite festive and I'd love to hang around and tell you more about it, but I really have to go order my Valentine's Day candy.  This year I'm getting myself some really pretty handmade truffles.  What!?  It's not that I think I might be "that" person (the one who doesn't get a Valentine's Day gift), but I'm not taking any chances.


January 19, 2015

How to Cut Multiple Cords at One Time - An Easy Tip for Micro Macrame


So here I am all excited to share this wonderful invention with you and you're all like "Huh, why is she so excited about a piece of cardboard with some screws in it?"  Because it's the greatest invention of all time - how's that!  Okay, maybe not the greatest because the whole Internet thing is pretty good, too, but it's up there in the Top 20 anyway. 

If you have to cut multiple cords of the same length, like the 50+ cords needed for my Leafy Cuff in Micro Macrame, you're going to love this.  All you need is a piece of wood a little longer than the length of cords you need and 3 screws (or nails).  This one has screws that have no grooves on the top 1/2" or so of the screw.  I think you'd want to use screws like this or just nails - something that won't snag and catch your cord like a regular screw.  


So take one screw and put it equidistant from both ends, off to one side.  Then place the other two screws as far apart as you want the length of your cords to be, with the center screw in the center of them.  So if you want 2 foot cords, you'll want to place each screw 1 foot from the center.  It probably makes more sense if you look at my photo than for me to try to explain it.  

In my example, I have screws set for 2 foot cords and 3 foot cords, as they are some of the most common lengths I've been cutting recently.


Isn't that great!?  I'm telling you, you might not think it's all that fabulous, but if you had to sit here and measure out hundreds of 2 foot cords, you'd be gushing, too.  Oh, and did you spy the little Dachshund nose in the beginning of the video?  That's my supervisor.

A recap for using the micro macrame gizmo - make a knot in the end of your cord and put it over the center screw to anchor it.  Pull your spool of cord out around the screws at the ends of the board.  You will end up with two cords for every time you make a complete circle and go past the center screw so you can keep count if you need a specific number of cords.


Once you've reached the number you need, cut all of the cords at once by cutting right above the center screw.


You can easily cut 50+ cords all at the same time.  You can thank me later.


January 15, 2015

The New Leafy Cuff in Micro Macrame Class in Online Now!


Leafy Cuff in Micro Macrame online class by Sherri Stokey screenshot

I am thrilled to announce (despite my many trials and tribulations detailed here) the release of my new Leafy Cuff in Micro Macrame class!!! That's right - it's LIVE!  The lovely folks at CraftArtEdu have the class up and running and what's more, it's on sale!  As a matter of face, all of my micro macrame classes there are on sale! 

Leafy cuff knotted in micro macrame original design by Sherri Stokey of Knot Just Macrame.

Go!  Find a class & learn something (that old dog/new trick thing is just a vicious rumor).  It will be fun!

 
PS.  Psst, hey Buddy... over here.  Yeah, you.  Over here.   You don't think you got what it takes to make one of these?  Nobody ever. has. to. know.  Get a ready-made one right here and I promise I'll keep it our little secret.


January 13, 2015

A Behind the Scenes Look at the Making of a Micro Macrame Class

Public domain photo

Putting together an online class might sound glamorous, but believe me, it isn't.  At least not in my world.  I hardly ever sit around in my mink coat with that sexy just-got-out-of-bed-looking-perfect hair and makeup smiling lovingly at the camera.  This is probably closer:

Public domain photo.

I am a one woman operation.  It's just me here.  Me and only me.  That means I have to do things like try to take pictures of myself doing the micro macrame knotting.  Sometimes I just don't have enough hands. So how does it work?  Let me give you a peek behind the scenes:  First I experiment with designs.  And most of the time, what I start with doesn't look much like what I end up with.  Take this cuff for example:

Not up to par macrame knotting.

I shouldn't call it a cuff, really, because I never finished off the ends.  It wasn't up to snuff, but I did learn quite a bit from it.  See that top edge?  That's where I attached all of the cords for the piece using larks head knots on a holding cord.  Turns out, that doesn't work very well.  The holding cord doesn't have enough body to support the knots without deforming and losing the crisp lines I was looking for.  So, not a success, but lesson learned.  The row that looks like x's worked well, as did the straight lines of double half hitch knots.  Good to know.  Beads work.  LOVE the scrolls at the bottom.  

So, how to attach all those cords to start?  I could use something other than a cord, like a piece of wire, but it would have to be substantial to do what I want it to do and then how would that work for my finished cuff?  It wouldn't.  The trick, then, is to come up with a different way to attach the cords...

Beaded edging on micro macame cuff.

Aha!  That lead to this fun beaded edging and I really like it!  Problem solved.  And I love the addition of the leaf outlines in the body of the cuff.  But now the bottom edging I had planned, the scrolls, didn't seem to work.  It just didn't "go" with the rest of this pattern.  Tuck that away for the next cuff project...

Micro macrame cuffs by Sherri Stokey of Knot Just Macrame.

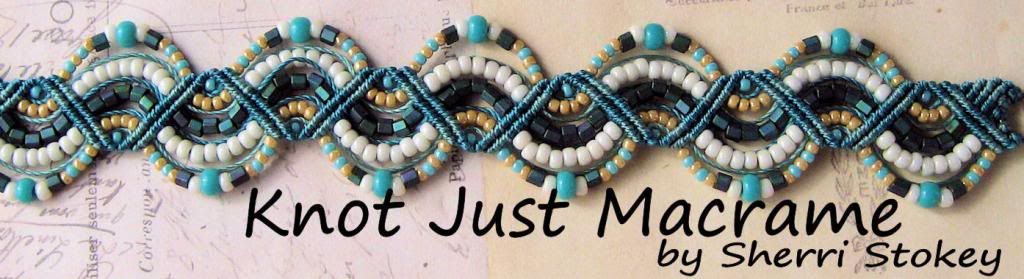
Well, yay!!  Now that I have a design for my class, it should be all easy from here.  Right?  Not so, my friend.  The navy cuff I made first is very small and barely fits my small wrist.  That probably won't work for most folks, so I decided I'd better add one pattern repeat.  I added the extra cords and did the cuff again in coral (and don't even ask me about the decision process behind the choice of coral - sheesh).  Anyway, the cuff turned out huge!  What?  How did that happen?

Turns out the pretty navy blue cord I used is not the same size as the c-lon or superlon bead cord I usually use.  It says it is .5mm cord, as do the c-lon and superlon, but the proof is in the pudding, kids.  The blue one and the green one are made with the same number of cords.  I did them both within days of one another, so I can safely assume that my knotting is probably fairly consistent.  The only difference is the brand of the cord.  Another lesson learned.  

This all led me to making one more cuff to make sure my size assumptions were correct.  I have to be sure before I put it in a class - people are counting on me to know what I'm talking about!

Oh, and taking pictures of all of the cuffs together like that not only led me to analyze the flaws in each one and compare and contrast, but also got me off on a tangent taking pretty pictures...

Micro macrame cuffs by Sherri Stokey of Knot Just Macrame.

I'm so easily distracted.  Seriously, I have the attention of a toddler (at best).  But the rest of the class should be easy going, right?  Uh huh.  You obviously forgot who you were dealing with here.  So, I'm doing my thing, knotting and stopping to take pictures and moving around the house with my work board and my camera and my light box following the natural light...

Camera on tripod with light box.

Because if I don't take advantage of the natural light, then I have to move to my even-more-ghetto setup involving a daylight bulb and a light box sitting on a speaker.  True story.

Light box set up using daylight bulbs in stand lamp.

Throw another couple of kinks into the mix like saying the wrong knot in one of the video clips - you wouldn't think that would be such a big deal, would you?  But I didn't catch it until I was putting together the class.  Which meant I'd already finished the bracelet and couldn't just reshoot that little bit.  I had to make a whole new bracelet and work it clear up to the step where I messed up in order to refilm those few minutes.  And that's why I have a green cuff.  I could have made another one in coral so that the video clip would have been exactly right, but I don't really like coral (back to that whole decision making thing when choosing the color in the first place) and more than that, I really don't like making the same thing twice.  Especially not back to back.  So if you see the class, I don't want to hear a word about the two cuff colors.  I meant to do that.

*Sigh*  Are you still with me?  I wonder sometimes if it's just me or if other people's lives go like this?  You should know, it's a minor miracle I ever get a class produced!  Even after all this, I had to redo the narration twice because you could hear me inhaling.  I'm not a loud breather usually - really, I'm not!  You wouldn't have known that from the first go-round, though.  And I learned (we won't go into how I learned) that I can't re-record just part of the class without it sounding like two different women did it (call me Sybil).  And it turns out if I record a 30 minute class twice through back to back it makes my throat a little hoarse (not sure why that would be true, either, because believe me, I've talked way more than an hour straight before).  So if you notice my voice getting a little funny towards the end of the class, I don't want to hear about that, either.  I meant to do that.
Colorful micro macrame cuff design for new class by Sherri Stokey.

After all that, though, I did manage to get the class to the editor and she gave it a thumbs up!  It might be available late this week - I'll keep you posted!


January 6, 2015

A Tip for Neater Micro Macrame

Micro macrame cuff bracelet knotted by Sherri Stokey of Knot Just Macrame.

One thing that will make your finished micro macrame pieces look better is neatness.  Those rows of tiny knots need to be as even and straight as possible if you really want the wow factor.  In this design, I've used two rows of double half hitch knots to underscore the beaded edging at the top and again to finish off the cuff at the bottom.  Keeping the rows spaced tightly together is a must.  So, how do you get your rows close?


That's my nifty little tip for neater knotting.  I hope it is useful for you.


January 2, 2015

Beading Back in Time - a Blog Hop challenge!

Beading Back in Time Blog Hop Challenge Header.

My friend Lindsay Starr and I are partners in beading (you might remember some my posts about her here, and here, and here).  We like many of the same things, like beads (of course).  We both have a fondness for silly sci-fi tv series, for example, and we're both crazy about dinosaurs.  Throw all of that together and what do you get?  A blog hop, of course!!

So here's the scoop:  we got so excited and carried away with the idea that we had to break it down into four challenges and we figured we would space them out over the year to give participants time to do something fun with each one.  The first challenge will cover history before us, meaning anything pre-human.  

Imagine a world covered in primordial seas dotted with organisms completely alien to us; bizarre things with no apparent heads, mouths or digestive organs. Even the land under our feet is foreign, the continents massing together and then drifting apart at least three times over millions and millions of years.  There are a few creatures around that we might recognize, like sponges, anemones and jellyfish, but for the most part, this world is a very different place.

Ancient life.

Fast forward a few (million) years and take another look.  There's been an explosion of life.  The seas teem with fish and large reptiles rule a land covered in huge forests of ferns and conifers.  There are creatures so fantastical they are beyond the scope of our imagination.

Fantastical prehistoric life on land and sea.

Fantastical prehistoric life in the skies.

Not quite accurate prehistoric creatures.

Our challenge is this:  during the month of January, create something inspired by this theme.  Use any medium you like and draw inspiration in any way that moves you, whether it is the earth, the seas, the creatures or even something more abstract like the seemingly impossible characteristics of the organisms.  Use a fossil in your design or make up your own dinosaur - whatever you want.  Then meet Lindsay and I back here on February 1st to see what everyone made.

And most of all, remember to have fun with it!

January 1, 2015

A New Micro Macrame Cuff

Micro Macrame knotting by Sherri Stokey of Knot Just Macrame.

My latest experiment in micro macrame knotting involved a whole lot of cords.  I wanted to shake things up a little, so I thought I'd try turning everything on its side - literally.  I worked this bracelet across instead of up and down, which meant I had to start with 112 cords across.  

Micro Macrame cuff in progress.

I did some beaded loops on one edge of the cuff to add some texture.

Beaded border for micro macrame cuff.

And a leafy design bordered by lines of knots and beads.

Beaded macrame cuff style bracelet in blue by Sherri Stokey

The cuff style bracelet is about 1.5" wide and fastens with a tube bar clasp.

Leafy vine pattern knotted in micro macrame

I'm excited all over again about micro macrame all over again!!

Beaded macrame cuff style bracelet in blue from Knot Just Macrame

Related Posts Plugin for WordPress, Blogger...