
Do you ever see a beautiful piece of handmade jewelry and get
depressed? Not because there's anything depressing about the piece, but
because you think you'll never be "good" enough to make something that
lovely? Well, stop that! This is a no-whining zone and self pity is counterproductive.
Don't get me wrong, I've been there. It's an easy trap to fall into,
but basically you have two choices: you can either admire the piece for
its artistry and purchase it from the person who has probably spent
countless hours creating it (and possibly several years learning before
that) or you can take a stab at it yourself.
I'm curious and I'm from a background where I want to try doing
everything. I wallpapered most every room in my house back in the 80s,
learned how to give home permanents, make candles and can tomatoes just
"because". As you can probably guess, not all were wise decisions.

(She's still mad at me about that one, by the way.) Luckily, I'm now at
an age where I know my limitations and instead of taking that as a
personal failing, I'm getting better at appreciating the talent of
others. Even if I could make a polymer clay lotus pendant like the one from Staci Louise that I used in this necklace, I would probably never get the feeling she has in her piece. And that's okay - it means Staci is doing something right!

If you decide you do want to try something for yourself, find a good tutorial or class and then go into it with the right mindset. Learn for the joy of learning and you will leave with a greater appreciation of the artist's process, even if you never use the technique again. And if you do discover something new that you love, that's even better!
So, for those of you who've made it this far in the post (and hopefully the others are over shopping in my Etsy store),
I'm going to give you a micro macrame primer. I'm going to cover the
tools and materials you will need to get started with micro macrame,
then I'm going to give you a couple weeks to round up your "stuff".
While you're doing that, I'll be busy writing up/recording a special
beginner project for us: the world's very first KnotAlong! I'm going
to meet you back here in two weeks (on August 21st) for your first
"class".
Are you ready, kids? I can't hear you! :)
Are you ready, kids? I can't hear you! :)
If you want to play along with my KnotAlong (and why wouldn't you?), you have two weeks to gather up these things. I've added some suggestions for sources* to get you started.
- Pinning surface: You can use cork or anything that will hold a pin. If you want to purchase a foam board, here are some sources: Amazon, Art Beads, Etsy, Walmart, Fusion Beads
- Fray Check: Fire Mountain, Amazon, Walmart, my local Walmart carries this in the sewing aisle as do most fabric stores.
- GS Hypo Cement: Fire Mountain, Amazon, Walmart, Art Beads
- Tex 400 nylon bead cord (I recommend C-lon or Superlon brand): Bello Modo, South Pass Beads (they have Hypo Cement, too), Shipwreck Beads, Jewels in Fiber. You will only need about 6 yards for our project, so you will have lots left on your spool for your next project. Don't get hung up on the cord, either. If you have some 1mm hemp on hand, it will work. I don't recommend Rattail or other "slippery" cord.
- Pins - straight sewing pins and/or T-pins: can be found in fabric stores, the sewing aisle at Walmart, Michaels, Hobby Lobby
- Scissors
- Something to straighten cord (hair straightener, curling iron, regular iron, etc.)
- Approximately 60 8/0 seed beads. Inexpensive craft store beads will work fine for this project.
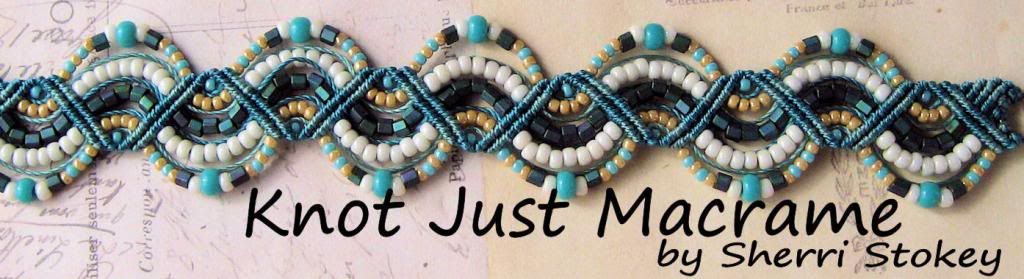
You won't find a better time to jump into micro macrame than this. Here's a peek at what we're going to make:

*Sources listed are US suppliers. Some others to try: UK - Knotting Ways,
I'm in . sounds like fun. I just recently started to do macrame again -last time it was large hemp OWL plant hangers, lol
ReplyDeletethis time I'm focusing on jewellery .
Totally in! I started a piece last night and well... Looks like I need a refresher course! (or ten) Thanks very much for including Australian suppliers!
ReplyDeleteOhh, I'm in. Have everything except perhaps the 8/0 beads.
ReplyDeleteI just got your Drunkard's Path Micro Macrame class on CraftArdEdu and am intimidated. So this knot-along is great timing. Hoping it truly is a beginner project!! Off to round up supplies ...
ReplyDeleteHow fun! I'm in! Looking forward to this project!
ReplyDeleteOff topic, but I was wondering where you get your matte metallic khaki iris beads? I've been searching different places but the ones I find don't look quite the same.
ReplyDeleteI've picked them up several places. They're Miyuki beads - #2035
DeleteAwesome, thank you!
ReplyDeleteI'm in too! Perfect timing for me. I have just recently finished getting some supplies so I'm ready to start..more importantly, ready to learn.
ReplyDeleteSame for me. I bought the supplies but haven't attempted a project yet.
DeleteLooking forward to the class. Have purchased supplies in the past and been to scared to try/ even have some books purchased and have looked at your etsy store and classes on Craftsy. Soo needed this boost.
ReplyDeleteThank you Sherri. Ruth
Thanks Sherri, this looks really interesting. I'm a beadweaver and normally make bracelets with just beads and have been looking for a new twist on my work (sorry bad joke) Do you have any informative projects that you used as a beginner?
ReplyDeleteI don't have any that I used as a beginner, but I do have quite a bit of information here on my blog as well as online classes and tutorials to help you out. This upcoming project (post will be out on Friday) will have a 44 minute video and will cover making this pendant very thoroughly. LOADS of info in there for beginners.
DeleteI am in! I tried making my first piece last night and it was a total disaster - I am excited to get started learning how to do this :)
ReplyDeleteI'm in, need fray check only.
ReplyDeleteYou can get by with whatever you can find. Even white glue if you make sure you don't have any thick spots.
DeleteI want to play too...
ReplyDeleteJust watc hed the video tutorial. It is so clear and informative.
ReplyDeleteI do have one question. Where do you purchase the split rings and what size should I look for? It makes a lot of sense to use them.
Ruth
This particular project doesn't require split rings, but I can find them at my local Walmart or on Etsy. I use a 7-8mm size for most things.
DeleteJust stumbled across this site this morning and I am so IN!!! I was looking for something new to learn and today on my lunch hour, I am gathering my supplies and cannot wait until I get home!!!!!
ReplyDeletePerfect! Happy to have you here!
DeleteGood morning, it's 2:27am on Thursday, 8/27, here in Nebraska and I, too, just found your site. I'm totally new to this craft...decided a week or two I needed to give it a go and have been researching/buying supplies since then. Was looking for answers to questions and looks like I've hit the jackpot with your site...looking forward to joining the group.
ReplyDeleteHey, I'm IN Nebraska! Nice to meet you, Omaha Jo!
Delete